PyQt6 Basics
All the examples given in this tutorial are based on PyQt6 graphical objects.
In this part, we will:
learn the basics of the development of a graphical window based on PyQt6,
list the main graphical objects that are useful for simple GUI,
discover how events are processed
Containers, contents and layouts
In PyQt6, a graphical application is made up of containers, contents, and layouts.
A container (for example QMainWindow or QWidget) defines the global window or a section of it.
The contents are the graphical elements inside the container (labels, buttons, text boxes, etc.).
The layout defines how these contents are positioned and resized within the container.
Example:
from PyQt6.QtWidgets import QApplication, QWidget, QLabel, QPushButton, QVBoxLayout
import sys
app = QApplication(sys.argv)
window = QWidget()
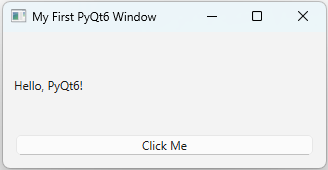
window.setWindowTitle("My First PyQt6 Window")
label = QLabel("Hello, PyQt6!")
button = QPushButton("Click Me")
layout = QVBoxLayout()
layout.addWidget(label)
layout.addWidget(button)
window.setLayout(layout)
window.show()
sys.exit(app.exec())
In this example, a simple window (QWidget) containing a label and a button arranged vertically using a QVBoxLayout is created. The button is clickable but nothing appends…
—
Main container / QMainWindow
QMainWindow is the main application window. It is typically used when you need standard window features such as menus, toolbars, and status bars.
Example:
from PyQt6.QtWidgets import QApplication, QMainWindow, QLabel
import sys

class MainWindow(QMainWindow):
    def __init__(self):
        super().__init__()
        self.setWindowTitle("QMainWindow Example")
        label = QLabel("This is the central widget")
        self.setCentralWidget(label)

app = QApplication(sys.argv)
window = MainWindow()
window.show()
sys.exit(app.exec())
Here, the QMainWindow automatically provides a window frame. The setCentralWidget() method sets the main content inside it.
Graphical container / QWidget
QWidget is the base class for all user interface objects in PyQt6. It is a flexible container that can hold other widgets and layouts. It’s often used as the main element of a simple window.
Example:
from PyQt6.QtWidgets import QWidget, QLabel, QVBoxLayout

widget = QWidget()
layout = QVBoxLayout()
layout.addWidget(QLabel("Inside QWidget"))
widget.setLayout(layout)
widget.show()
—
Graphical objects
QLabel
QLabel is used to display text or images in a window. It provides a simple way to show static information such as text, images, or even HTML content.
Example:
label = QLabel("This is a simple text label")
# You can also display an image
# label.setPixmap(QPixmap("logo.png"))
QLineEdit
QLineEdit is a widget that allows the user to enter a single line of text. It is often used for names, search bars, or any text input.
Example:
from PyQt6.QtWidgets import QLineEdit, QLabel, QVBoxLayout, QWidget

widget = QWidget()
layout = QVBoxLayout()

label = QLabel("Enter your name:")
input_field = QLineEdit()
input_field.setPlaceholderText("Type here...")

layout.addWidget(label)
layout.addWidget(input_field)
widget.setLayout(layout)
widget.show()
The setPlaceholderText() method shows a greyed-out hint until the user types something.
CSS style
Most of the graphical objects in PyQt6 can be customized by adding style sheets in CSS language. They use the same syntax as CSS in web design.
Example:
button.setStyleSheet("""
    QPushButton {
        background-color: lightblue;
        border-radius: 10px;
        padding: 8px;
    }
    QPushButton:hover {
        background-color: lightgreen;
    }
""")
Layouts overview
In PyQt6, layouts are used to organize widgets inside a window or container. They control how widgets are positioned, resized, and aligned when the window changes size.
Without layouts, widgets may overlap or fail to resize properly. The most common layouts are:
QHBoxLayout: places widgets horizontally (side by side)
QVBoxLayout: places widgets vertically (top to bottom)
QGridLayout: arranges widgets in a grid (rows and columns)
Each layout automatically manages spacing and resizing.
QHBoxLayout
Places widgets next to each other in a horizontal line. It aligns widgets from left to right, automatically adjusting their size if the window changes width.
Example:
from PyQt6.QtWidgets import QApplication, QWidget, QPushButton, QHBoxLayout
import sys

app = QApplication(sys.argv)
window = QWidget()
window.setWindowTitle("QHBoxLayout Example")

layout = QHBoxLayout()

layout.addWidget(QPushButton("Left"))
layout.addWidget(QPushButton("Center"))
layout.addWidget(QPushButton("Right"))

window.setLayout(layout)
window.show()
sys.exit(app.exec())
QVBoxLayout
Places widgets on top of each other in a vertical column. This is useful for creating columns of buttons or text fields that resize gracefully.
Example:
from PyQt6.QtWidgets import QApplication, QWidget, QPushButton, QVBoxLayout
import sys

app = QApplication(sys.argv)
window = QWidget()
window.setWindowTitle("QVBoxLayout Example")

layout = QVBoxLayout()
layout.addWidget(QPushButton("Top"))
layout.addWidget(QPushButton("Middle"))
layout.addWidget(QPushButton("Bottom"))

window.setLayout(layout)
window.show()
sys.exit(app.exec())
QGridLayout
QGridLayout organizes widgets into a table with rows and columns. You can specify the exact position of each widget using coordinates (row, column). This layout is especially useful for forms, control panels, or calculator interfaces.
Example:
from PyQt6.QtWidgets import QApplication, QWidget, QPushButton, QGridLayout
import sys

app = QApplication(sys.argv)
window = QWidget()
window.setWindowTitle("QGridLayout Example")

layout = QGridLayout()

layout.addWidget(QPushButton("(0,0)"), 0, 0)
layout.addWidget(QPushButton("(0,1)"), 0, 1)
layout.addWidget(QPushButton("(1,0)"), 1, 0)
layout.addWidget(QPushButton("(1,1)"), 1, 1)

window.setLayout(layout)
window.show()
sys.exit(app.exec())
—
Summary of Layouts
Tip: Layouts can also be nested (for example, a vertical layout containing several horizontal layouts). This is very common for building complex GUIs with flexible design.
—
With these layout techniques, you can now structure your PyQt6 applications in a clean, responsive, and professional way — ensuring your interface adapts gracefully to different screen sizes and user interactions.
Events and signals
Events are user actions (like mouse clicks, key presses, or window resizing) that the application can respond to. Signals are messages emitted by widgets to indicate that an event occurred. Slots are functions or methods that handle these signals.
Example:
from PyQt6.QtWidgets import QApplication, QPushButton
import sys

app = QApplication(sys.argv)

def say_hello():
    print("Hello, World!")

button = QPushButton("Say Hello")
button.clicked.connect(say_hello)
button.show()

sys.exit(app.exec())
The clicked signal is emitted when the button is pressed. The function say_hello() is the slot that is executed in response.
—
This simple structure forms the foundation of GUI programming in PyQt6: you define widgets, arrange them with layouts, customize their appearance with CSS, and make them interactive through signals and slots.
Below is a complete example that combines all the concepts learned so far: - QMainWindow as the main window - QWidget and layouts - QLabel, QPushButton, and QLineEdit - Signals and slots - CSS styling - An exit confirmation dialog
Example:
from PyQt6.QtWidgets import (
    QApplication, QMainWindow, QWidget,
    QLabel, QPushButton, QLineEdit,
    QVBoxLayout, QHBoxLayout, QMessageBox
)
from PyQt6.QtCore import Qt
import sys


class MainWindow(QMainWindow):
    def __init__(self):
        super().__init__()

        # --- Window setup ---
        self.setWindowTitle("PyQt6 Interactive Example")
        self.resize(400, 300)

        # --- Central widget ---
        central_widget = QWidget()
        self.setCentralWidget(central_widget)

        # --- Layouts ---
        main_layout = QVBoxLayout()
        input_layout = QHBoxLayout()
        button_layout = QHBoxLayout()

        # --- Widgets ---
        self.label = QLabel("Welcome! Type your name below:")
        self.label.setAlignment(Qt.AlignmentFlag.AlignCenter)

        self.input_name = QLineEdit()
        self.input_name.setPlaceholderText("Enter your name here")

        self.button_greet = QPushButton("Greet")
        self.button_clear = QPushButton("Clear")
        self.button_quit = QPushButton("Quit")

        # --- Layout organization ---
        input_layout.addWidget(self.input_name)
        button_layout.addWidget(self.button_greet)
        button_layout.addWidget(self.button_clear)
        button_layout.addWidget(self.button_quit)

        main_layout.addWidget(self.label)
        main_layout.addLayout(input_layout)
        main_layout.addLayout(button_layout)

        central_widget.setLayout(main_layout)

        # --- Signals and Slots ---
        self.button_greet.clicked.connect(self.greet_user)
        self.button_clear.clicked.connect(self.clear_text)
        self.button_quit.clicked.connect(self.close_app)

        # --- CSS Style ---
        self.setStyleSheet("""
            QLabel {
                font-size: 18px;
                color: #333333;
            }
            QLineEdit {
                border: 2px solid #cccccc;
                border-radius: 8px;
                padding: 6px;
                font-size: 14px;
            }
            QPushButton {
                background-color: #0078D7;
                color: white;
                font-weight: bold;
                border: none;
                border-radius: 8px;
                padding: 8px 14px;
            }
            QPushButton:hover {
                background-color: #339CFF;
            }
            QPushButton:pressed {
                background-color: #005A9E;
            }
        """)

    # --- Slots ---
    def greet_user(self):
        name = self.input_name.text()
        if name:
            self.label.setText(f"Hello, {name}!")
        else:
            self.label.setText("Please enter your name first.")

    def clear_text(self):
        self.input_name.clear()
        self.label.setText("Welcome! Type your name below:")

    def close_app(self):
        reply = QMessageBox.question(
            self,
            "Exit Confirmation",
            "Do you really want to quit?",
            QMessageBox.StandardButton.Yes | QMessageBox.StandardButton.No
        )
        if reply == QMessageBox.StandardButton.Yes:
            self.close()


if __name__ == "__main__":
    app = QApplication(sys.argv)
    window = MainWindow()
    window.show()
    sys.exit(app.exec())
Explanation: This program creates an interactive window that greets the user by name.
The main window (QMainWindow) holds a QWidget with vertical and horizontal layouts.
A QLineEdit lets the user type their name.
When the “Greet” button is clicked, the label updates to show “Hello, name!”.
The “Clear” button resets both the input field and label.
The “Quit” button opens a confirmation dialog before closing the app.
CSS styles define the visual appearance of buttons, text fields, and labels.
—
With this example, you now have the foundations for creating interactive and visually customized GUIs using PyQt6 — combining text input, buttons, labels, and events into a fully functional application.